Introduction
In this project we are going to build a notepad application using core java, Swing and AWT. For running this project, copy the source code and save it as Notepad.java and run as java application.
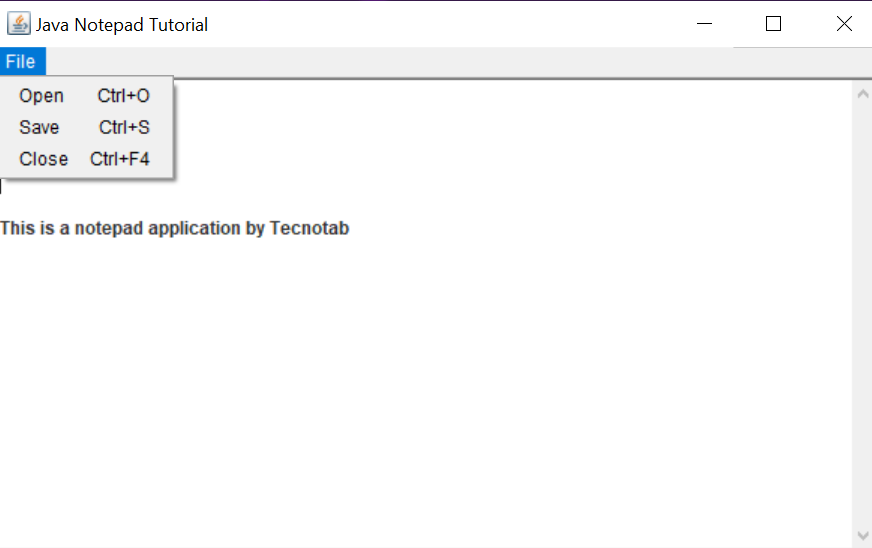
Snapshot of the application

Source code (Notepad.java)
package sourcecode;

import java.awt.BorderLayout;
import java.awt.Font;
import java.awt.Menu;
import java.awt.MenuBar;
import java.awt.MenuItem;
import java.awt.MenuShortcut;
import java.awt.TextArea;
import java.awt.event.ActionEvent;
import java.awt.event.ActionListener;
import java.awt.event.KeyEvent;
import java.io.BufferedWriter;
import java.io.FileReader;
import java.io.FileWriter;
import java.util.Scanner;

import javax.swing.JFileChooser;
import javax.swing.JFrame;

public class Notepad extends JFrame implements ActionListener {
  private TextArea textArea = new TextArea("", 0,0, TextArea.SCROLLBARS_VERTICAL_ONLY);
  private MenuBar menuBar = new MenuBar(); // first, create a MenuBar item
	private Menu file = new Menu(); // our File menu
	// what's going in File? let's see...
	private MenuItem openFile = new MenuItem();  // an open option
	private MenuItem saveFile = new MenuItem(); // a save option
	private MenuItem close = new MenuItem(); // and a close option!

	public Notepad() {
		this.setSize(500, 300); // set the initial size of the window
		this.setTitle("Java Notepad Tutorial"); // set the title of the window
		setDefaultCloseOperation(EXIT_ON_CLOSE); // set the default close operation (exit when it gets closed)
		this.textArea.setFont(new Font("Century Gothic", Font.BOLD, 12)); // set a default font for the TextArea
		// this is why we didn't have to worry about the size of the TextArea!
		this.getContentPane().setLayout(new BorderLayout()); // the BorderLayout bit makes it fill it automatically
		this.getContentPane().add(textArea);

		// add our menu bar into the GUI
		this.setMenuBar(this.menuBar);
		this.menuBar.add(this.file); // we'll configure this later

		// first off, the design of the menuBar itself. Pretty simple, all we need to do
		// is add a couple of menus, which will be populated later on
		this.file.setLabel("File");

		// now it's time to work with the menu. I'm only going to add a basic File menu
		// but you could add more!

		// now we can start working on the content of the menu~ this gets a little repetitive,
		// so please bare with me!

		// time for the repetitive stuff. let's add the "Open" option
		this.openFile.setLabel("Open"); // set the label of the menu item
		this.openFile.addActionListener(this); // add an action listener (so we know when it's been clicked
		this.openFile.setShortcut(new MenuShortcut(KeyEvent.VK_O, false)); // set a keyboard shortcut
		this.file.add(this.openFile); // add it to the "File" menu

		// and the save...
		this.saveFile.setLabel("Save");
		this.saveFile.addActionListener(this);
		this.saveFile.setShortcut(new MenuShortcut(KeyEvent.VK_S, false));
		this.file.add(this.saveFile);

		// and finally, the close option
		this.close.setLabel("Close");
		// along with our "CTRL+F4" shortcut to close the window, we also have
		// the default closer, as stated at the beginning of this tutorial.
		// this means that we actually have TWO shortcuts to close:
		// 1) the default close operation (example, Alt+F4 on Windows)
		// 2) CTRL+F4, which we are about to define now: (this one will appear in the label)
		this.close.setShortcut(new MenuShortcut(KeyEvent.VK_F4, false));
		this.close.addActionListener(this);
		this.file.add(this.close);
	}

	public void actionPerformed (ActionEvent e) {
		// if the source of the event was our "close" option
		if (e.getSource() == this.close)
			this.dispose(); // dispose all resources and close the application

		// if the source was the "open" option
		else if (e.getSource() == this.openFile) {
			JFileChooser open = new JFileChooser(); // open up a file chooser (a dialog for the user to browse files to open)
			int option = open.showOpenDialog(this); // get the option that the user selected (approve or cancel)
			// NOTE: because we are OPENing a file, we call showOpenDialog~
			// if the user clicked OK, we have "APPROVE_OPTION"
			// so we want to open the file
			if (option == JFileChooser.APPROVE_OPTION) {
				this.textArea.setText(""); // clear the TextArea before applying the file contents
				try {
					// create a scanner to read the file (getSelectedFile().getPath() will get the path to the file)
					Scanner scan = new Scanner(new FileReader(open.getSelectedFile().getPath()));
					while (scan.hasNext()) // while there's still something to read
						this.textArea.append(scan.nextLine() + "\n"); // append the line to the TextArea
				} catch (Exception ex) { // catch any exceptions, and...
					// ...write to the debug console
					System.out.println(ex.getMessage());
				}
			}
		}

		// and lastly, if the source of the event was the "save" option
		else if (e.getSource() == this.saveFile) {
			JFileChooser save = new JFileChooser(); // again, open a file chooser
			int option = save.showSaveDialog(this); // similar to the open file, only this time we call
			// showSaveDialog instead of showOpenDialog
			// if the user clicked OK (and not cancel)
			if (option == JFileChooser.APPROVE_OPTION) {
				try {
					// create a buffered writer to write to a file
					BufferedWriter out = new BufferedWriter(new FileWriter(save.getSelectedFile().getPath()));
					out.write(this.textArea.getText()); // write the contents of the TextArea to the file
					out.close(); // close the file stream
				} catch (Exception ex) { // again, catch any exceptions and...
					// ...write to the debug console
					System.out.println(ex.getMessage());
				}
			}
		}
	}
   // the main method, for actually creating our notepad and setting it to visible.
	public static void main(String args[]) {
        Notepad app = new Notepad();
        app.setVisible(true);


}
}